With the proliferation of digital cameras and digital images it is very likely that at least some of you have an incorrect image or concept in your head when you hear the word 'noise' in the context of pictures. That incorrect image may not be one of noise, but of pixelization.
For example, let's start with a standard picture to which we can compare all others we talk about. That picture will be this:

For reference, this is 3456x2304 pixels (8 megapixels), tripod-mounted, 200mm, 1.3 sec at F6.3, ISO100.
There's a lot of information there, and one of the things I'm looking forward to today is explaining the majority of it to you.
Pictures - be they analog or digital - are made when light is focused onto a surface by a lens for a specified amount of time. In traditional photography that surface is a frame of film. In digital photography that surface is a charge-coupled device, or CCD (or something like it).
It's easier to talk about resolution when it comes to digital images, so we'll start there. The first number I tossed out (3456x2304) are the number of pixels in the above image. The first number is by width, and the second is by height. The multiplication of the two clocks in just below 8 million, which is how the concept of 8 megapixels (MP) is derived - it's how many pixels make up the total image.
If you zoom in on the above image you're going to see some pretty true lines - this number of pixels give a very good resolution for defining objects. Pixelization occurs when there aren't enough pixels to adequately define a line. We can demonstrate this by taking the exact same image and reducing its size. First, let's take it down to 200x133. That's not even quite 1 megapixel:

If you look at the hard edges of some of the dice (especially the white one in the center with a 2 showing), you can start to see how the edges are beginning to look more like steps than hard lines. This is because there aren't enough pixels spread across the image to 'smooth' that line. This will be less apparent on true horizontal or vertical lines and worst on lines angled 45 degrees to the sides.
We can make this worse to really illustrate the point - here's the same image taken down to 20x13

When you cut the number of pixels - in any given horizontal or vertical line - in half, the new pixels are created by averaging two pixels into one. You can see that happening here, to large effect. Each pixel no longer describes a really small area of the photo (think grains of sand in the first image), but a wide section of it. This is pixelization. It is not noise - it is lack of resolution. When you see little staircases in your pictures (granted you're not taking pictures of little staircases), your problem is image size. For most of us, something like 8MP is more than enough.
One of the other things you might recognize in this picture is that the only lines that can be defined in any reasonable way are those that are horizontal or vertical. At this degree of pixelization the ability to meaningfully describe 45 degree angles is practically non-existent.
I mentioned above that a picture is made when light is focused onto a surface for a specified amount of time. This takes us to the next point - the lens.
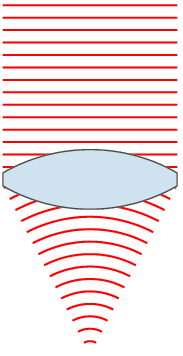
If you're reading this article you're using some lenses - your eyes. Some of you might be using some extra lenses in addition to your eyes in the form of glasses or contact lenses. The notion is that these lenses are taking light from a wide area and focusing it down to a point or area. If you want to learn more about lenses you can start here:
http://en.wikipedia.org/wiki/Lens_%28optics%29
Or just spend some time staring at this totally public domain image from the same article:
The number I quoted above (200mm) relates to the length of the lens. Most people (I did for a long time) think that this relates to how long the actual lens you put on your camera is. While that is somewhat true, it's not the actual measurement. A 'mm' measurement on a camera lens is actually fairly complicated, but for our purposes is most directly related to how far the back element of the lens (the last piece of glass in the lens) is from the surface that you're focusing on.
If you have a zoom lens sitting around (okay, so not everyone does), you can check this by taking it off your camera and zooming it. While the whole lens gets longer this is actually being done to move the last lens element away from the body of the camera.
This measure of a lens isn't really important to our discussion, but now you know a little more about cameras, right?
The last three numbers above are actually pretty important - they're the heart of exposure in photography.
To remind you, they were "1.3 sec at F6.3, ISO100."
Remember that a picture is made when a lens focuses light on a surface for a specified amount of time.
The three things that drive exposure are shutter speed, aperture, and film/sensor sensitivity. They are a balancing act - as you increase or decrease one you have to account for that change in some change in one or both of the other two.
When you take a picture you're opening the shutter behind the lens to let light hit the sensor for as long as the shutter is open. In the above example this was 1.3 seconds (one of the reasons I did this tripod mounted). This is fairly simple.
Also behind (or often in) the lens is the aperture - a series of panels that close down to let less light back into the camera. To demonstrate this, hold up your hand with your thumb closest to your and the rest of your fingers in a line behind it. Now touch the tip of your index finger to the inside tip of your thumb, to form a circle - think of giving someone a gesture of 'okay'.
That circle is a decent size, at least the largest you're going to be able to make with those two fingers. Slowly move the tip of your index finger down the side of your thumb and into the crease between them. As you do this you should notice that the circle formed by them is (more or less) staying a circle, but slowly getting smaller.
This is more or less what the aperture is doing inside your camera.
The measure for aperture is usually represented as F'something' - in the above example it's F6.3. This number is actually a ratio - it's the ratio of the mm length of the lens to the mm opening of the aperture. Thus, as the size of the aperture opening gets smaller and smaller the F number actually gets bigger. This is because the numerator of the fraction is staying the same and the denominator is getting smaller - the outcome is a larger number (think 1/4 vs 1/2, or 4/4 vs 4/2).
With some quick math, we can thus figure out (no one ever figures this out, ever) how wide open the aperture was for this shot. 6.3 = 200mm/x -> x ~ 31mm
The higher the aperture (F) number, the less light is getting into the camera. This means that the shutter has to be open longer. Exposure is balanced in this way - the more light the aperture lets in the shorter the shutter is open, and vice versa. That's not the whole story, though.
We're almost to the punchline, by the way. The last number is ISO100, and it translates to the sensitivity of the medium. In traditional photography this is the sensitivity of the film surface to light - achieved by packing more light sensitive chemicals in the film frame. Each roll of film is a particular sensitivity and can't be changed on the fly. In digital photography this is the sensitivity of the CCD to light - achieved by...well, turning up the sensitivity of the CCD to light. One of the advantages of digital imagery is that this can be easily changed on the fly at any time.
Most digital cameras range from an ISO of around 100 to somewhere around 1600 or 3200. Some make it up to 6400, but the scale follows doubling rules - that is the jump from 100 to 200 is the same as from 400 to 800 or 3200 to 6400.
Like I said, if you want to know a whole lot more about CCDs you can start on that wikipedia page. They're pretty cool, but complicated enough that I'm not going to get into them too deeply here.
What we're going to consider them as are electronic devices with a number of holes that photons can fall into. What are photons? For our purposes...uh, pieces of light.
If you think of the first image we looked at we know that there are something like 8 million pixels in the image. As long as the lens is focusing things adequately, that means that the picture can account for light coming from (being reflected by in this case) around 8 million sources.
Electronics are imperfect. Many are designed to operate in particular tolerances. My camera's CCD may very well be rated for use at ISO100. Pushing it higher than that - again for our purposes - can be thought of as a way of overclocking it. More specifically, sacrificing accuracy for power.
You see, there are error rates at play here. If we're treating the CCD as a photon collector then its job is to tell the onboard computer every time a photon passes through the gates at any pixel. If you want this to be pretty accurate you need to make sure you're letting in what you are actually looking for. This means setting higher thresholds for what is considered a photon.
Think of it a different way. At the lowest ISO settings you're setting pretty high standards in terms of letting things through. Imagine 8 million tiny bouncers - complete with velvet ropes - each standing next to one of the pixels on the CCD. They are responsible for making sure that what's getting through the gates is actually a photon, and not just a false positive. At low ISO they are pretty thorough - they have a list and you had best be on it. They're so thorough that they may stop some actual photons from getting in. They're willing to sacrifice some false negatives to make sure that false positives are near zero.
If you're in a situation with a lot of light this isn't a problem. This might be because there's a lot of light in the scene, or because you're allowing a lot of light to get into the camera (long shutter speed, tripod).
If you're in a situation with not much light (and no tripod), you might be willing to relax your draconian stance on false positives to make sure you're catching more of those photons you turned away as false negatives. An ISO200 bouncer is twice as relaxed as an ISO100 bouncer, an ISO400 bouncer is twice as relaxed as that, etc.
At a certain point, the bouncer is barely doing his job at all. For my camera that's around ISO1600. He's letting in photons, but he's also letting in his friends and any rift-raft that happen to wander along. It is a party, and everyone is invited.
Here's how it begins to play out:
ISO100:

ISO400:

ISO1600:

FYI, all of these are now at a fixed aperture of F8 (which is about the sweet spot on my lens), so shutter speed varies (goes down) as the sensitivity increases.
If you have a keen eye you might start to notice a bit more noise in some of the areas of the picture as the sensitivity goes up. This brings us to an actual conversation of what that noise represents.
There's some 'true' image here that represents what was actually sitting on the table in front of me while I took these pictures. Each pixel should have a value relating to the number of pixels that made it past each gate (I'm simplifying the fact that this is a color photo), and the lower the ISO the closer to 'truth' this should be. Put another way, the observed values should cluster more closely around the actual values at lower ISO values.
When you turn up the sensitivity by raising the ISO you start getting measurements of things that aren't actually true - this is noise. You begin to see it as a sort of 'digital grain' - if you weren't able to pick up on it above we can zoom in a bit to really make it clear:
ISO100:

ISO400:

ISO1600:

At this point you should be able to see the pixel-level noise that starts to manifest itself at higher sensitivity. Things look fairly 'real' at ISO100, even at this level of zoom. At ISO400 you start to see a bit of that 'digital grain', and at ISO1600 it is very pronounced.
What is it, though?
Well, it's noise, and it's (presumably) random. If this image was gray-scale each pixel would be establishing a level between black and white, represented by a number. We can think the same way for each pixel in a color image, except there are actually a few color channels being measured.
Let's say, though, that any given pixel in the scene is actually reflecting x quantity of light. If that pixel is being measured by the sensor as x, then you're getting a highly accurate representation of the scene. It's more likely that there's some error present in your measurement, that is: observed = true + error
That error can be positive or negative by pixel, and again should be fairly random. The less you are trying to push the sensitivity the more accurate each pixel can be - the closer observed will be to true. That's why the image at ISO100 looks fairly 'true' - the bouncer at this level is providing a good deal of scrutiny and making sure things are what they seem.
The reason the image at ISO1600 looks 'grainy' is because these error bars increase with increased sensitivity. If the magnitude of error is higher, then your observation (the CCD's observation) of any given pixel is going to tend to be less 'true' - farther away from x on average.
If you're particularly inclined, you can imagine a normal distribution around this true value x. The higher the sensitivity, the flatter and wider this distribution. You're much more likely to pull a number that's highly incorrect at ISO1600 than you are at ISO100.
When you look at the ISO1600 image, you're seeing individual pixels because there's a contrast emerging between adjacent pixels. Contrast is simply the magnitude of the difference between two areas - if you're looking to define a difference between black and white, or lighter or darker, contrast is great. Flat-screen TVs often let you know what their contrast is, something displayed like 10,000:1 - this means that the whites that the TV is capable of producing are 10,000 times brighter than the blacks it is capable of producing.
The contrast you're achieving at a pixel level in the ISO1600 image is partly false contrast, however. The color and luminosity of one of the dice at any given location is actually pretty similar to the area (pixels) directly adjacent. The reason that you're seeing a difference is because noise is being distributed randomly and making some pixels lighter and some pixels darker. When a pixel is randomly made lighter than those around it you notice it much more than if it was similar to those pixels around it. It looks like a small bit of light surrounded by darker area.
This is why you're seeing 'grain' - what you're seeing is deviations from 'true' at the pixel level.
All said, there's still an assumption there that this error and noise is randomly distributed. Because of this, there's a way that you can have the best of both worlds - high sensitivity but accurate observation.
It may be a fun thought experiment to stop reading here for a second to see if you can use the information provided to independently come up with a way to remove noise in images like those at ISO1600.
It has to do with averaging.
If we assume that the noise at each pixel is randomly distributed then the best guess for the actual 'true' value for any pixel should be the average information for that pixel across multiple images. This is also where a tripod is necessary - if you take a number of pictures of the same thing (in this case I did around 70, but that's way overkill) you can average them to find a best guess for the 'true' value of that pixel.
There are actually some good tools available to do this - the one I use is called ImageStacker. An image is really just a lot of information relating to the value of each pixel in the image. In a grayscale image that has to do with gradients of black and white, and in a color image it relates to the gradients of a few different colors.
Basically, though, you can conceptualize an 8MP digital image as 8 million numbers telling you the state of each pixel (again, more if you want to consider color). It's easy enough to take 8 million averages using today's computers, and that's what programs that do this are doing.
Perhaps the result would speak best for itself.
Here's the full single image at ISO1600:

And here's 70 images at ISO1600, averaged into one image:

Again, the best picture is probably painted at a high zoom where noise would be the most apparent. Here's the zoom on a single image at ISO1600:

And here's the zoom on 70 images at ISO1600, averaged:

For comparison, here's also again the zoomed image at ISO100:

Obviously, the average is quite a bit closer to the single ISO100 image.
Keep in mind as well that the image averaged from 70 images is NOT 70 times larger as a file. It's still just one image, and is the same size as any one of the images that were used to produce it. What's being thrown away in the process isn't image information, but redundancy and noise. The 'true' information that exists in every picture is that which is shared - the redundancy across those images is used (in effect) to determine what is 'true'. That - again - is done through simple averaging.
The fact that it works demonstrates that this noise is in fact randomly distributed - if there was a bias one way or another the averaged image would have a luminosity or color shift when compared to the single image at ISO100. It does not. In fact, they're fairly indistinguishable to the eye. What I'm noticing when I really look is that the ISO100 image actually has a bit more noise than the average. For instance, take a closer look at the green d6 in the lower right corner.
Hopefully - if you're still with me - you understand a whole lot more about how cameras work. Oh, and maybe you have a better understanding of random error. Or maybe you just want to roll some dice. I'd be happy with any of those outcomes.
And for those that are just wondering if they can have a full size example of all these dice, here you go:

For example, let's start with a standard picture to which we can compare all others we talk about. That picture will be this:
For reference, this is 3456x2304 pixels (8 megapixels), tripod-mounted, 200mm, 1.3 sec at F6.3, ISO100.
There's a lot of information there, and one of the things I'm looking forward to today is explaining the majority of it to you.
Pictures - be they analog or digital - are made when light is focused onto a surface by a lens for a specified amount of time. In traditional photography that surface is a frame of film. In digital photography that surface is a charge-coupled device, or CCD (or something like it).
It's easier to talk about resolution when it comes to digital images, so we'll start there. The first number I tossed out (3456x2304) are the number of pixels in the above image. The first number is by width, and the second is by height. The multiplication of the two clocks in just below 8 million, which is how the concept of 8 megapixels (MP) is derived - it's how many pixels make up the total image.
If you zoom in on the above image you're going to see some pretty true lines - this number of pixels give a very good resolution for defining objects. Pixelization occurs when there aren't enough pixels to adequately define a line. We can demonstrate this by taking the exact same image and reducing its size. First, let's take it down to 200x133. That's not even quite 1 megapixel:
We can make this worse to really illustrate the point - here's the same image taken down to 20x13
When you cut the number of pixels - in any given horizontal or vertical line - in half, the new pixels are created by averaging two pixels into one. You can see that happening here, to large effect. Each pixel no longer describes a really small area of the photo (think grains of sand in the first image), but a wide section of it. This is pixelization. It is not noise - it is lack of resolution. When you see little staircases in your pictures (granted you're not taking pictures of little staircases), your problem is image size. For most of us, something like 8MP is more than enough.
One of the other things you might recognize in this picture is that the only lines that can be defined in any reasonable way are those that are horizontal or vertical. At this degree of pixelization the ability to meaningfully describe 45 degree angles is practically non-existent.
I mentioned above that a picture is made when light is focused onto a surface for a specified amount of time. This takes us to the next point - the lens.
If you're reading this article you're using some lenses - your eyes. Some of you might be using some extra lenses in addition to your eyes in the form of glasses or contact lenses. The notion is that these lenses are taking light from a wide area and focusing it down to a point or area. If you want to learn more about lenses you can start here:
http://en.wikipedia.org/wiki/Lens_%28optics%29
Or just spend some time staring at this totally public domain image from the same article:
The number I quoted above (200mm) relates to the length of the lens. Most people (I did for a long time) think that this relates to how long the actual lens you put on your camera is. While that is somewhat true, it's not the actual measurement. A 'mm' measurement on a camera lens is actually fairly complicated, but for our purposes is most directly related to how far the back element of the lens (the last piece of glass in the lens) is from the surface that you're focusing on.
If you have a zoom lens sitting around (okay, so not everyone does), you can check this by taking it off your camera and zooming it. While the whole lens gets longer this is actually being done to move the last lens element away from the body of the camera.
This measure of a lens isn't really important to our discussion, but now you know a little more about cameras, right?
The last three numbers above are actually pretty important - they're the heart of exposure in photography.
To remind you, they were "1.3 sec at F6.3, ISO100."
Remember that a picture is made when a lens focuses light on a surface for a specified amount of time.
The three things that drive exposure are shutter speed, aperture, and film/sensor sensitivity. They are a balancing act - as you increase or decrease one you have to account for that change in some change in one or both of the other two.
When you take a picture you're opening the shutter behind the lens to let light hit the sensor for as long as the shutter is open. In the above example this was 1.3 seconds (one of the reasons I did this tripod mounted). This is fairly simple.
Also behind (or often in) the lens is the aperture - a series of panels that close down to let less light back into the camera. To demonstrate this, hold up your hand with your thumb closest to your and the rest of your fingers in a line behind it. Now touch the tip of your index finger to the inside tip of your thumb, to form a circle - think of giving someone a gesture of 'okay'.
That circle is a decent size, at least the largest you're going to be able to make with those two fingers. Slowly move the tip of your index finger down the side of your thumb and into the crease between them. As you do this you should notice that the circle formed by them is (more or less) staying a circle, but slowly getting smaller.
This is more or less what the aperture is doing inside your camera.
The measure for aperture is usually represented as F'something' - in the above example it's F6.3. This number is actually a ratio - it's the ratio of the mm length of the lens to the mm opening of the aperture. Thus, as the size of the aperture opening gets smaller and smaller the F number actually gets bigger. This is because the numerator of the fraction is staying the same and the denominator is getting smaller - the outcome is a larger number (think 1/4 vs 1/2, or 4/4 vs 4/2).
With some quick math, we can thus figure out (no one ever figures this out, ever) how wide open the aperture was for this shot. 6.3 = 200mm/x -> x ~ 31mm
The higher the aperture (F) number, the less light is getting into the camera. This means that the shutter has to be open longer. Exposure is balanced in this way - the more light the aperture lets in the shorter the shutter is open, and vice versa. That's not the whole story, though.
We're almost to the punchline, by the way. The last number is ISO100, and it translates to the sensitivity of the medium. In traditional photography this is the sensitivity of the film surface to light - achieved by packing more light sensitive chemicals in the film frame. Each roll of film is a particular sensitivity and can't be changed on the fly. In digital photography this is the sensitivity of the CCD to light - achieved by...well, turning up the sensitivity of the CCD to light. One of the advantages of digital imagery is that this can be easily changed on the fly at any time.
Most digital cameras range from an ISO of around 100 to somewhere around 1600 or 3200. Some make it up to 6400, but the scale follows doubling rules - that is the jump from 100 to 200 is the same as from 400 to 800 or 3200 to 6400.
Like I said, if you want to know a whole lot more about CCDs you can start on that wikipedia page. They're pretty cool, but complicated enough that I'm not going to get into them too deeply here.
What we're going to consider them as are electronic devices with a number of holes that photons can fall into. What are photons? For our purposes...uh, pieces of light.
If you think of the first image we looked at we know that there are something like 8 million pixels in the image. As long as the lens is focusing things adequately, that means that the picture can account for light coming from (being reflected by in this case) around 8 million sources.
Electronics are imperfect. Many are designed to operate in particular tolerances. My camera's CCD may very well be rated for use at ISO100. Pushing it higher than that - again for our purposes - can be thought of as a way of overclocking it. More specifically, sacrificing accuracy for power.
You see, there are error rates at play here. If we're treating the CCD as a photon collector then its job is to tell the onboard computer every time a photon passes through the gates at any pixel. If you want this to be pretty accurate you need to make sure you're letting in what you are actually looking for. This means setting higher thresholds for what is considered a photon.
Think of it a different way. At the lowest ISO settings you're setting pretty high standards in terms of letting things through. Imagine 8 million tiny bouncers - complete with velvet ropes - each standing next to one of the pixels on the CCD. They are responsible for making sure that what's getting through the gates is actually a photon, and not just a false positive. At low ISO they are pretty thorough - they have a list and you had best be on it. They're so thorough that they may stop some actual photons from getting in. They're willing to sacrifice some false negatives to make sure that false positives are near zero.
If you're in a situation with a lot of light this isn't a problem. This might be because there's a lot of light in the scene, or because you're allowing a lot of light to get into the camera (long shutter speed, tripod).
If you're in a situation with not much light (and no tripod), you might be willing to relax your draconian stance on false positives to make sure you're catching more of those photons you turned away as false negatives. An ISO200 bouncer is twice as relaxed as an ISO100 bouncer, an ISO400 bouncer is twice as relaxed as that, etc.
At a certain point, the bouncer is barely doing his job at all. For my camera that's around ISO1600. He's letting in photons, but he's also letting in his friends and any rift-raft that happen to wander along. It is a party, and everyone is invited.
Here's how it begins to play out:
ISO100:
ISO400:
ISO1600:
FYI, all of these are now at a fixed aperture of F8 (which is about the sweet spot on my lens), so shutter speed varies (goes down) as the sensitivity increases.
If you have a keen eye you might start to notice a bit more noise in some of the areas of the picture as the sensitivity goes up. This brings us to an actual conversation of what that noise represents.
There's some 'true' image here that represents what was actually sitting on the table in front of me while I took these pictures. Each pixel should have a value relating to the number of pixels that made it past each gate (I'm simplifying the fact that this is a color photo), and the lower the ISO the closer to 'truth' this should be. Put another way, the observed values should cluster more closely around the actual values at lower ISO values.
When you turn up the sensitivity by raising the ISO you start getting measurements of things that aren't actually true - this is noise. You begin to see it as a sort of 'digital grain' - if you weren't able to pick up on it above we can zoom in a bit to really make it clear:
ISO100:
ISO400:
ISO1600:
At this point you should be able to see the pixel-level noise that starts to manifest itself at higher sensitivity. Things look fairly 'real' at ISO100, even at this level of zoom. At ISO400 you start to see a bit of that 'digital grain', and at ISO1600 it is very pronounced.
What is it, though?
Well, it's noise, and it's (presumably) random. If this image was gray-scale each pixel would be establishing a level between black and white, represented by a number. We can think the same way for each pixel in a color image, except there are actually a few color channels being measured.
Let's say, though, that any given pixel in the scene is actually reflecting x quantity of light. If that pixel is being measured by the sensor as x, then you're getting a highly accurate representation of the scene. It's more likely that there's some error present in your measurement, that is: observed = true + error
That error can be positive or negative by pixel, and again should be fairly random. The less you are trying to push the sensitivity the more accurate each pixel can be - the closer observed will be to true. That's why the image at ISO100 looks fairly 'true' - the bouncer at this level is providing a good deal of scrutiny and making sure things are what they seem.
The reason the image at ISO1600 looks 'grainy' is because these error bars increase with increased sensitivity. If the magnitude of error is higher, then your observation (the CCD's observation) of any given pixel is going to tend to be less 'true' - farther away from x on average.
If you're particularly inclined, you can imagine a normal distribution around this true value x. The higher the sensitivity, the flatter and wider this distribution. You're much more likely to pull a number that's highly incorrect at ISO1600 than you are at ISO100.
When you look at the ISO1600 image, you're seeing individual pixels because there's a contrast emerging between adjacent pixels. Contrast is simply the magnitude of the difference between two areas - if you're looking to define a difference between black and white, or lighter or darker, contrast is great. Flat-screen TVs often let you know what their contrast is, something displayed like 10,000:1 - this means that the whites that the TV is capable of producing are 10,000 times brighter than the blacks it is capable of producing.
The contrast you're achieving at a pixel level in the ISO1600 image is partly false contrast, however. The color and luminosity of one of the dice at any given location is actually pretty similar to the area (pixels) directly adjacent. The reason that you're seeing a difference is because noise is being distributed randomly and making some pixels lighter and some pixels darker. When a pixel is randomly made lighter than those around it you notice it much more than if it was similar to those pixels around it. It looks like a small bit of light surrounded by darker area.
This is why you're seeing 'grain' - what you're seeing is deviations from 'true' at the pixel level.
All said, there's still an assumption there that this error and noise is randomly distributed. Because of this, there's a way that you can have the best of both worlds - high sensitivity but accurate observation.
It may be a fun thought experiment to stop reading here for a second to see if you can use the information provided to independently come up with a way to remove noise in images like those at ISO1600.
It has to do with averaging.
If we assume that the noise at each pixel is randomly distributed then the best guess for the actual 'true' value for any pixel should be the average information for that pixel across multiple images. This is also where a tripod is necessary - if you take a number of pictures of the same thing (in this case I did around 70, but that's way overkill) you can average them to find a best guess for the 'true' value of that pixel.
There are actually some good tools available to do this - the one I use is called ImageStacker. An image is really just a lot of information relating to the value of each pixel in the image. In a grayscale image that has to do with gradients of black and white, and in a color image it relates to the gradients of a few different colors.
Basically, though, you can conceptualize an 8MP digital image as 8 million numbers telling you the state of each pixel (again, more if you want to consider color). It's easy enough to take 8 million averages using today's computers, and that's what programs that do this are doing.
Perhaps the result would speak best for itself.
Here's the full single image at ISO1600:
And here's 70 images at ISO1600, averaged into one image:
Again, the best picture is probably painted at a high zoom where noise would be the most apparent. Here's the zoom on a single image at ISO1600:
And here's the zoom on 70 images at ISO1600, averaged:
For comparison, here's also again the zoomed image at ISO100:
Obviously, the average is quite a bit closer to the single ISO100 image.
Keep in mind as well that the image averaged from 70 images is NOT 70 times larger as a file. It's still just one image, and is the same size as any one of the images that were used to produce it. What's being thrown away in the process isn't image information, but redundancy and noise. The 'true' information that exists in every picture is that which is shared - the redundancy across those images is used (in effect) to determine what is 'true'. That - again - is done through simple averaging.
The fact that it works demonstrates that this noise is in fact randomly distributed - if there was a bias one way or another the averaged image would have a luminosity or color shift when compared to the single image at ISO100. It does not. In fact, they're fairly indistinguishable to the eye. What I'm noticing when I really look is that the ISO100 image actually has a bit more noise than the average. For instance, take a closer look at the green d6 in the lower right corner.
Hopefully - if you're still with me - you understand a whole lot more about how cameras work. Oh, and maybe you have a better understanding of random error. Or maybe you just want to roll some dice. I'd be happy with any of those outcomes.
And for those that are just wondering if they can have a full size example of all these dice, here you go:
No comments:
Post a Comment